
Saturday, December 29, 2007
Saturday, December 8, 2007
Create Rich Web Apps with AJAX
Assume you want to create a Web service named MathService that exposes a Web Method named Add():
[ScriptService]
[WebService(Namespace =
   "http://www.interfacett.com/")]
[WebServiceBinding(ConformsTo =
   WsiProfiles.BasicProfile1_1)]
public class MathService : WebService
{
   [WebMethod]
   public int Add(int x, int y)
   {
      return x + y;
   }
}
You AJAX-enable the Web service's class by applying the ScriptServiceAttribute class directly to it as shown. No other changes are required at the Web service level for AJAX-enabled applications to call it. Other classes such as ScriptMethodAttribute and GenerateTypeAttribute can also be used in a Web service although they're not required. More information about these attributes can be found here. Web services called by ASP.NET AJAX-enabled pages must be in the same domain as the page where the call originates from. This is due to security restrictions built into the XmlHttpRequest object used to make Web service requests. Although you can't call external Web services directly using ASP.NET AJAX, you can still make calls to external Web services by creating a local Web service that acts as the middleman. For example, assume you want to create a Web service that calls an Amazon.com service to retrieve book information (see Listing 2). This Web service relies on a class named AmazonSearch to call the Amazon.com service through a Web service proxy object and retrieve the desired data. You can find the Web Service Description Language (WSDL) document that describes the Amazon.com Web service here, and you can sign up for a free access account here. Amazon.com provides a free Web service called Amazon e-Commerce Service that you can use to retrieve information about books, DVDs, albums, and many other items sold on the Amazon.com Web site. By using the service, you can display Amazon.com products on your Web site and even receive a portion of sale proceeds for items purchased from your site. The service can be accessed for free once you've registered (registration is also free) and received an access key. The Amazon.com e-Commerce Service supports the latest standards and the team supporting the service provides samples that demonstrate calling the service in multiple languages, as well as a forum for posting questions about the service. You might wonder why I chose to use a Web service from a commercial vendor, such as Amazon, because this goes against the grain of VSM's usual approach. The reason: I wanted to show you a real-world implementation in action, as opposed to an example more theoretical than practical, and few non-commercial examples exist that have the robustness of Amazon's approach. Plus, it's free, and the terms of use are reasonable. ASP.NET AJAX provides a simple and efficient mechanism for calling Web services that have been marked with the ScriptServiceAttribute class. You can't right-click on your Web site project in Visual Studio .NET 2005 and add a Web Reference to create a Web service proxy, but you can use ASP.NET AJAX's ScriptManager control to create a client-side proxy that handles calling the service and passing JSON messages. You accomplish this using the ScriptManager's Services property and the ServiceReference control:
<asp:ScriptManager ID="smp" runat="server">
   <Services>
      <asp:ServiceReference
         Path="AmazonService.asmx" />
   </Services>
   <Scripts>
      <asp:ScriptReference
         Path="Scripts/Amazon.js" />
   </Scripts>
</asp:ScriptManager>
Defining a service reference on the ScriptManager control causes a client-side proxy class to be generated and added to the page at runtime. This proxy code looks something like this:
<script src="AmazonService.asmx/js"
      type="text/javascript"></script>
Note that the ASMX file is called directly and that "js" is added to the end of the path. The service is marked with the ScriptService attribute, so the ASP.NET AJAX runtime generates the JavaScript proxy code needed to call the service automatically. To call a Web service using a client-side proxy object, you reference the service's namespace, class, and method name using JavaScript. Parameter data required by the Web service's Web Method is passed to the method along with the name of the callback method. All calls to Web services are made asynchronously, and the callback method is invoked when a Web service call returns data to the browser. When the page containing the client-side Web service proxy first loads, it calls the SearchBooks() method (see Listing 3). This method locates a div tag with an ID of divAmazon and assigns a value of "Loading Books" to its innerHTML property. It then calls the local AmazonService.asmx service by referencing the service's namespace (GolfClubShack), class (AmazonService), and Web Method name (GetBooks). The GetBooks() method accepts three parameters, including the book text to search, the data results page to grab, and the name of the callback method. In this example a callback named OnWSCallback() is defined. Data returned from the Web service is routed automatically to the OnWSCallback() method, which processes the data (see Figure 1). The method iterates through all of the books returned and accesses different properties of each book, such as ImageUrl, Title, and Price. Note that you access each property in a strongly typed manner, much as you would when writing server-side code using C# or VB.NET. This strongly typed access to object property data is made possible by the proxy code generated by the ScriptManager. In addition to shipping the ASP.NET AJAX Extensions, Microsoft has also released a separate download called the ASP.NET AJAX Toolkit (also available here). This toolkit contains more than 30 AJAX-enabled controls for performing a variety of tasks. One of the controls that ties in nicely to Web services is the AutoCompleteExtender control. You've probably seen such a control if you've visited the Google suggest site or have the Google search box embedded in your browser. You can use this control to provide suggestions to end users as they type into a textbox. The control works by reading characters typed into a textbox and passing them to a Web service. The Web service performs a lookup against a data source to find data items that match with the initial characters typed and passes the matching items back to the AutoCompleteExtender control. The control then shows the matching data items directly below the textbox so that users can select them (see Figure 2). Using the AutoCompleteExtender requires that you copy the AjaxControlToolkit.dll assembly into your Web site's bin directory. This assembly is available in the ASP.NET AJAX Toolkit. You need to reference the AjaxControlToolkit.dll assembly once the assembly is available to use. Do this in web.config or in the page where you want to use the AutoCompleteExtender control. Add this code to the web.config file's <system.web> begin and end tags to reference the assembly in web.config and make it available for all pages on a Web site:
<pages>
   <controls>
      <add tagPrefix="toolkit"
         namespace="AjaxControlToolkit"
         assembly="AjaxControlToolkit" />
   </controls>
</pages>
Add this code to the top of a page to reference the assembly in a specific page:
<%@ Register
   TagPrefix="toolkit"
   Namespace="AjaxControlToolkit"
   Assembly="AjaxControlToolkit"
%>
After you reference the assembly, you can define the AutoCompleteExtender in the target page. The control boasts several key properties, including the target control ID to extend the textbox with auto-complete behavior, the minimum number of characters to accept in the target control before calling the Web service, and the name of the Web service and Web Method that will be called to look up data items. This code defines an AutoCompleteExtender control that extends a TextBox with an ID of txtSearch:
<toolkit:AutoCompleteExtender id="ac" runat="server"
   ServicePath="~/AutoCompleteService.asmx"
   ServiceMethod="GetSearchItems"
   TargetControlID="txtSearch"
   EnableCaching="true"
   MinimumPrefixLength="2"
/>
Once the number of characters to watch for has been reached (as defined using the AutoCompleteExtender's MinimumPrefixLength property), the Web service defined on the control is called to look for matching data items. For example, this Web service handles searching for matching data items and returning them to the AutoCompleteExtender control to display on the page (see Listing 4). The GetSearchItems() Web Method accepts two parameters: prefixText and count. The prefixText parameter contains the characters typed by the end user, while the count parameter contains the number of matching items to return back to the AutoCompleteExtender control. Data items that start with the value supplied by the prefixText parameter are returned from the Web Method in a string array. The ASP.NET AJAX Extensions provide several different ways to retrieve data from a back-end server using AJAX technologies. Although the UpdatePanel control will be all that's needed in many situations, integrating Web services into your Web applications can result in smaller request and response messages, which can lead to faster load times. By leveraging Web services you can also process and format data directly on the client rather than on the server. Web services can also be used to aid users as they type into textboxes by using controls such as the AutoCompleteExtender control found in the ASP.NET AJAX Toolkit. Source
ASP.NET C# - Enter Key
ASP.NET 2.0 makes this problems easier and introduce a concept of a "default button". New defaultbutton attribute can be used with <form> or <asp:panel> control. What button will be "clicked" depends of where acutally cursor is and what button is choosen as a default button for form or a panel.
Here is sample HTML code that contains one form and one panel control:
<form defaultbutton="button1" runat="server">
<asp:textbox id="textbox1" runat="server"/>
<asp:textbox id="textbox2" runat="server"/>
<asp:button id="button1" text="Button1" runat="server"/>
<asp:panel defaultbutton="button2" runat="server">
<asp:textbox id="textbox3" runat="server"/>
<asp:button id="button2" runat="server"/>
</asp:panel>
</form>
Saturday, December 1, 2007
Linux: Tips for new Ubuntu installation
Installing libdvdcss2 and w32 video codecs in Ubuntu Gutsy Gibbon
Support for WMV, RealMedia and other formats has been bundled into the w32codecs package. This package is not available from the Ubuntu repositories due to licensing and legal restrictions.
For Ubuntu Gutsy Gibbon Users run the following command
sudo wget http://www.medibuntu.org/sources.list.d/gutsy.list -O /etc/apt/sources.list.d/medibuntu.list
Now you need to copy the key using the following command
wget -q http://packages.medibuntu.org/medibuntu-key.gpg -O-¦ sudo apt-key add -
Update the source list using the following command
sudo apt-get update
Install Codecs using the following command
sudo apt-get install w32codecs libdvdcss2
Using above download locations you can install most of the mutimedia codecs for ubuntu.
sudo apt-get update
Mplayer Plugin for Firefox
If you want to install Mplayer with plug-in for Mozilla Firefox run the following command
sudo apt-get install mozilla-mplayer
Wednesday, November 28, 2007
Tuesday, November 20, 2007
Linux: Find files on your computer with find
A standard Linux system has an incredible amount of files installed. Looking for a file location can be a painful task to do though a file browser.
Fortunately, there is a nifty command line available by default on any Linux distribution: find.
find can virtually find anything on your computer and comes with a lot of options. This tutorial will introduce a basic use of it and show how you can search your filesystem for file names matching a name pattern.
On Debian based distros, find is part of the package findutils. find allow one to search for files on a filesystem based on different condition, creation date, modified date, file size, file type, permissions, name ....
In this tutorial, I will be focused on finding files/directories based on their name, in order to explain in more depth the syntax of find, I will also show how you can narrow down your search by adding condition on size and file modification time.
This will suit most searches, if you need more details, I would recommend looking at the find's manpage.
1. Find basis
The default syntax of find is as such:
find [path] [expression]
where path is the path used as root for searching pattern and expression the expression we want the file to match.
2. Finding a file based on filename
Let say for instance you want to find all .avi files in users home directories. Search files can be found with the following command:
# find /home -name '*.avi'
If you want to search for *.mpg and *.avi files, you will use the following:
find /home -name '*.mpg' -o -name '*.avi'
Case insensitive searches can be achieved by using the -iname switch:
find /home -iname '*.mpg' -o -iname '*.avi'
3. Adding some more criterias
Those kind of searches might returns far too many results, making it hard to find waht you were looking for in the first place.
Fortunately, you can narrow down the search by adding criteria such as the file size and the file modification date.
Let'search for .avi files bigger than 700M. This can be done with:
find /home/ -name '*.avi' -a -size +700M
Now, let's find the same subset of files that were modified less than 15 days ago:
find /home/ -name '*.avi' -a -size +700M -mtime -15
4. Adding some actions
Grand, we can now find files based on a subset of criteria. What
would be even better is to apply some actions on those files. Action
can be done with the use of -exec switch.
We can now find .avi file that are newer that 15 days, in this example,
we are going to move those file to another location: /my/new/movies . I
consider that this directory already exist on your system.
Moving .avi files bigger than 700M and younger than 15 days to /my/new/movies can be done with:
find /home/ -name '*.avi' -a -size +700M -mtime -15 -exec mv '{}' /my/new/movies/ \;
Mind the use of '{}' and \; (there is a space before \;).
'{}' matches the file that was found, while \; terminate the exec statement.
5. Conclusion
find is a powerful tool with an extensive set of statement. This article only covered a small subset of available features. For more information on the find command I recommend checking out its man page.
Powered by ScribeFire.
Saturday, November 10, 2007
Single Instance Application
Making an application single instance, can be achieved by using a mutex (Mutual Exclusion Semaphore).
A Windows application loads the main form through the Application.Run( ) method. In the Main method, create a new mutex. If a new mutex is created the application is allowed to run. If the mutex has already been created, the application cannot start. This will ensure that only one instance will be running at any time.
// Used to check if we can create a new mutex
bool newMutexCreated = false;
// The name of the mutex is to be prefixed with Local\ to make
// sure that its is created in the per-session namespace,
// not in the global namespace.
string mutexName = "Local\\" +
 System.Reflection.Assembly.GetExecutingAssembly().GetName().Name;

Mutex mutex = null;
try
{
   // Create a new mutex object with a unique name
   mutex = new Mutex(false, mutexName, out newMutexCreated);
}
catch(Exception ex)
{
   MessageBox.Show (ex.Message+"\n\n"+ex.StackTrace+
        "\n\n"+"Application Exiting...","Exception thrown");
   Application.Exit ();
}

// When the mutex is created for the first time
// we run the program since it is the first instance.
if(newMutexCreated)
{
   Application.Run(new AnimatedWindowForm());
}
When a new mutex is created the mutex name can be prefixed with either Global\ or Local\. Prefixing with Global\ means the mutex is effective in the global namespace.
Prefixing with Local\ means the mutex is effective in the user's session namespace only.
Windows XP and Windows 2003 allow fast user switching through Terminal Services Sessions. So if a mutex is created with a Global\ prefix, the application can have only one instance system wide. So if one user launches the application, other users cannot create a second instance in their sessions. If the mutex is not prefixed with Local\ it is effective per session only.
Placing Your C# Application in the System Tray
- To get started, open an existing C# Windows form (or create a new one).
- Open the Visual Studio Toolbox.
- Drag a NotifyIcon control onto the form. The control will named notifyIcon1 by default and placed below the form because it has no visual representation on the form itself.
- Set the NotifyIcon control's Text property to the name you want to appear when the user pauses the mouse over the application's icon. For example, this value could be "KillerApp 1.0".
- Set the control's Icon property to the icon that you want to appear in the System Tray
- Add an event handler for the form's Resize event that will hide the application when it's minimized. That way, it won't appear on the task bar.
- Add an event handler for the NotifyIcon.DoubleClick event and code it as follows so that the application will be restored when the icon is double-clicked.
private void Form1_Resize(object sender, System.EventArgs e)
{
  if (FormWindowState.Minimized == WindowState)
     Hide();
}
private void notifyIcon1_DoubleClick(object sender,
                                    System.EventArgs e)
{
   Show();
   WindowState = FormWindowState.Normal;
}
At this point, your application will fuction perfectly in terms of an icon appearing in the System Tray when the application is run (see Figure 1), the application not appearing on the task bar when minimized and the application restoring itself when the Tray icon is double-clicked.

Figure 1
Now, let's see the steps involved with adding a context menu to the icon.
- From the Visual Studio Toolbox, drag a ContextMenu control onto the form.
- Right-click the ContextMenu control and select the Edit Menu.option.
- Type in the options that you want to appear in your context menu. For example, you can add options such as Restore and Close Application.
- As with any menu, double-click the menu item to create and code each item's handler. As an example, you could copy the code from the form's DoubleClick handler into the context menu's Restore handler and for the Close Application menu item; simply call the form's Close method.
- Finally, set the NotifyIcon control's ContextMenu property to the new context menu you just created by selecting the menu from the drop-down list. Figure 2 shows a simple Tray context menu.

Friday, October 26, 2007
Friday, October 12, 2007
חידות לראיון עבודה
חידות בראיון עבודה הן משהו שקשה להתחמק ממנו אבל די קל לעבור אותן בעיקר כשערן רום מביא לכם את התשובות, אז קבלו את חלק א' של החידות והפתרונות העיוור והכדים
חידה - מול עיוור מונחים שני כדים, ברשותך 50 כדורים שחורים ו-50 כדורים אדומים.
עליך לחלק את הכדורים בצורה כזו שלעיוור יהיה הסיכוי הגבוה ביותר להוציא כדור אדום.
איך תעשה זאת?
פתרון - יש לשים כדור אדום אחד בכד מסוים ובכד השני את כל שאר הכדורים, כך נגיע לסיכוי של בערך 75%.
הסבר: בכד עם הכדור הבודד הסיכוי הוא מאה אחוז ובכד השני קצת פחות מחמישים אחוז.
שלוש קערות
חידה - יש לנו 3 קערות שבהן ישנן גולות שחורות, גולות לבנות או מעורב, גולות שחורות וגולות לבנות.
על כל קערה רשום פתק:
שחור, לבן או מעורב (שחור ולבן)
ידוע ששלושת הפתקים שקריים.
תוך כמה הוצאות של כדורים תדעו מה הפתק המתאים לכל קערה?
פתרון - הוצאה אחת תספיק.
הסבר: מאחר ונתון שכל הפתקים לא נמצאים על הקערה הנכונה די להוציא כדור אחד מהקערה המעורבת, בהתאם לצבע של הכדור שייצא נדביק מבדקה שחור או לבן ואת הפתקים האחרים פשוט נחליף. זה הסידור הנכון.
החבית הכבדה
חידה - יש 9 חביות ואחת כבדה יותר מהשאר. כיצד תאתרו את החבית הכבדה ביותר בעזרת שתי שקילות בלבד?
פתרון - שוקלים שתי קבוצות של 3 חביות, אם קבוצה אחת יותר כבדה אז שוקלים שם חבית אחת מול חבית אחת.
במצב של שיוויון בשקילה הראשונה ממשיכים עם שלושת החביות שלא שקלנו.
אם יש שיוויון בשקילה השנייה אזי החבית שנותרה בחוץ בשקילה זו היא החבית המבוקשת (הכבדה).
זמן ופתילים
חידה - אנו רוצים למדוד זמן בעזרת פתילים. לרשותנו שני פתילים אשר זמן הבעירה של כל אחד מהם הוא שעה. קצב הבעירה אינו קבוע (כלומר חצי מאורך הפתיל לא יבער חצי מזמן בערת הפתיל). כיצד תמדדו שלושת רבעי שעה?
פתרון - מדליקים פתיל אחד משני הצדדים ופתיל אחד רק מצד אחד, כשהפתיל הראשון מסיים מדליקים את הצד השני של הפתיל השני.
הסבר: אחרי שהדלקנו את הפתיל הראשון משני צדדיו תעבור חצי שעה. אז אם נדליק את הצד השני של הפתיל השני נקבל רבע שעה, סך הכל שלושת רבעי שעה.
כובעים בקופסה
חידה - בקופסה יש חמישה כובעים: שלושה שחורים ושניים לבנים. בוחרים שלושה באקראי ומעמידים בטור שלושה אנשים כאשר האחרון בטור רואה את הכובעים של אלה לפניו, אך לא את שלו. האמצעי רואה את של הראשון והראשון לא רואה אף כובע.
האחרון אומר:אני לא יודע איזה כובע יש לי.
האמצעי אומר:אני לא יודע איזה כובע יש לי.
הראשון אומר: אני יודע איזה כובע יש לי. איזה כובע יש לראשון?
פתרון - לראשון יש בהכרח כובע שחור.
הסבר: אם האחרון לא יודע איזה כובע יש לו מכאן שלשני הראשונים יש או שני כובעים שחורים או כובע שחור אחד וכובע לבן אחד.
מאחר וגם האמצעי לא יודע איזה כובע יש לו (ואם לראשון היה לבן הוא הרי היה יודע שיש לו שחור), נקבל שלראשון יש כובע שחור
Saturday, October 6, 2007
What is ctfmon.exe And Why Is It Running?
You are no doubt reading this article because you are frustrated with the ctfmon.exe process that just won't stop opening no matter what you do. You remove it from the startup items and it just magically reappears. So what is it?
Ctfmon is the Microsoft process that controls Alternative User Input and the Office Language bar. It's how you can control the computer via speech or a pen tablet, or using the onscreen keyboard inputs for asian languages.
If you are using any of the above, you should leave it enabled. For everybody else, we'll get to the job of disabling this annoying service.

Depending on your system configuration, there are a number of different steps to disable it. I've tried to list all the methods below.
Step 1: Disabling in Microsoft Office 2003
We can remove the alternative text input from Microsoft Office 2003 by just removing that feature in the setup.
Note: I haven't figured out where the equivalent setting is for Office 2007 (if there is one), but we can also disable it a different way below.
Go to Add/Remove programs, choose to Change your installation of Microsoft Office and make sure you check the box for "Choose advanced customization of applications" before you hit next.

Find "Alternative User Input" in the list and change the dropdown to "Not available" so it looks like this:

Step 2a: Disabling in Windows XP
There's an additional step we can take to make sure it gets turned off in Windows XP, which really seems to be the best answer for XP users.
Open up Control Panel and choose Regional and Language Options.

Choose the Languages tab and then click on Details in the top section.

Now on the Advanced tab you can choose to "Turn off advanced text services", which should immediately close ctfmon.

You'll also want to take a look at the first Settings tab, and make sure that your "Installed Services" box looks similar to this one:

If you have more than one Installed service then ctfmon might come back… For instance on my system there was an input for my drawing tablet so I could use it as a text input… which I don't care about, so I clicked Remove on it.
Step 2b: Disabling in Windows Vista
The setting above for completely disabling text services doesn't seem to exist in Windows Vista as far as I can tell, but we can remove the additional input services using a similar method.
Open Control Panel, choose Regional and Language Options and then find "Change keyboards or other input methods".

On the Keyboards and Languages tab, you can select Change keyboards.

Now you'll finally be at the same screen as in Windows XP. You'll again want to remove the extra installed services in the list other than your default keyboard language.

Step 3: Remove From Startup
You won't want to perform this step before doing the others, because it will just be overwritten again. Open up msconfig.exe through the start menu run or search box, and then find the Startup tab.

Find ctfmon in the list and disable it by unchecking the box. Just remember that if you haven't disabled ctfmon through one of the other settings this won't help you a lot.
Step 4: If all else fails
You can just completely unregister the dlls that run the alternative input services by running these two commands from the run box (one at a time)
Regsvr32.exe /u msimtf.dll
Regsvr32.exe /u msctf.dll
If you perform this step, you should also use Step 3 to get rid of the startup entries.
Step 5: Reboot
Reboot your computer and then open a Microsoft Office application if you do have that installed. Verify that ctfmon.exe is not running.
For more information you can read the Microsoft article on the subject.
Thursday, October 4, 2007
Saturday, September 29, 2007
Firefox - new profile
Step 1: Start Firefox and export your bookmarks as a file on your hard-drive (we'll need them later).

Step 2: Type firefox.exe - P in the Run box of Windows. (see screenshot)
Step 3: Click the Create Profile button without making any modifications to your existing profile (which is normally called "default")

Now when you Start Firefox in the new profile, you are very likely to be impressed with the speed. You can import the bookmarks that you saved in Step 1. If you have made any changes to the Firefox Dictionary, copy the persdict.dat word list file from the old profile folder to the new one.
Yes, there won't be any old Firefox add-ons in the new profile but the browser will be extremely quick and won't hog the CPU - just the way you want Firefox to run on your computer.
And if you ever need to revert to the old profile, just type Firefox -P again and click the old profile. Nothing is lost.
Tuesday, September 25, 2007
DOS command to delete directory with all sub directories without confirmations
Windows XP DOS command deletes the C:\TEST directory and all subdirectories WITHOUT ANY WARNING:
RD C:\TEST/S /Q
/S = Removes all directories and files in the specified directory in addition to the directory itself. Used to remove a directory tree.
/Q = Quiet mode, do not ask if OK to remove a directory tree with /S.
Saturday, September 8, 2007
Friday, September 7, 2007
Clean Up Ubuntu Grub Boot Menu After Upgrades
To remove GRUB entries, we'll need to edit the file /boot/grub/menu.lst. You can do this by using Alt+F2 and then typing in the following command:
gksu gedit /boot/grub/menu.lst

Now that we've got the file open, scroll down to the bottom of the file where it says "End Default Options", and you'll find all the menu entries for the various kernels in here. You can just select and delete the ones you want.
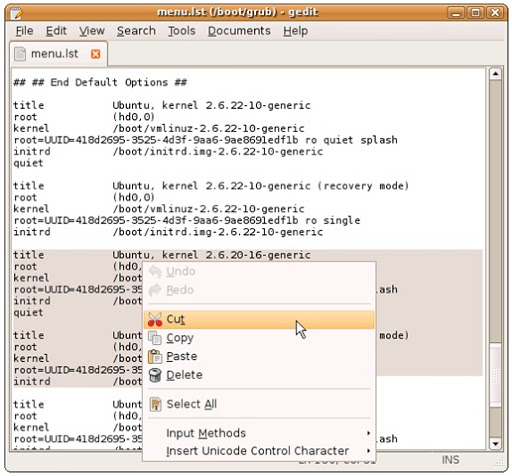
Save the file, and then the next time you boot up you'll see a much nicer set of options.
Comments:
No need to delete those lines to simplify the GRUB menu. The easier way to keep only newest lines is to open the menu.lst (gksu gedit /boot/grub/menu.lst), find "#howmany=all" and change it to "#howmany=1″. Then run "sudo update-grub" to update changes. Next time, only newest kernel lines will be shown.
Monday, September 3, 2007
Directory Security and Access Rules
using System.Security.AccessControl;FileSystemAccessRule faRule;
FileSystemRights fsrRights;
fsrRights = FileSystemRights.FullControl;
faRule = new FileSystemAccessRule(new NTAccount("DOMAIN\\user"),
fsrRights,
InheritanceFlags.ObjectInherit | InheritanceFlags.ContainerInherit,
PropagationFlags.InheritOnly, AccessControlType.Allow
);
//security.AddAccessRule(faRule); //File.SetAccessControl(txtFile.Text, security); DirectorySecurity dirsec = Directory.GetAccessControl(@"\\server\sub$\folder");dirsec.AddAccessRule(faRule);
Directory.SetAccessControl(@"\\server\sub$\folder", dirsec);
Sunday, August 26, 2007
Saturday, August 25, 2007
Ms Word tips
Where Was I? I get up and walk around frequently when I’m writing—gets the blood flowing. Sometimes I close a document I am editing, and when I come back to it and open it up, I just hit Shift + F5 to return to the exact place in the document where I was editing.
Serial Saves. If you’re like me, you often have many documents open at once. For safety’s sake, I like to frequently save all of them at once. To do this, hold down the Shift key when you go to the File menu. This changes Save to Save All.
Paragraph Hopping. You can circumvent the multi-step process of cutting, pasting and deleting to move paragraphs with an easy paragraph hopping feature. Often when I’m writing, I decide that a given paragraph would work better above or below another one. Do this: Go into a document with several paragraphs and put your cursor at the beginning of one of the middle paragraphs. Hold down the Shift and Alt keys in unison, then use the up and down arrow keys to “hop” the paragraph to new positions in the document.
One Fell Swoop Word Deletion. You can delete entire words with your keyboard. Just put your cursor at the beginning of the word and press Ctrl and Del together. This is very useful when editing.
Customize Line Spacing and Alignment. The Ctrl key is your best buddy when you want to experiment with line spacing and alignment variations. Ctrl + 1 provides single spacing, Ctrl + 2 provides double spacing and Ctrl + 5 provides 1-1/2 line spacing. Ctrl + R right aligns a paragraph, Ctrl + L left aligns one, and Ctrl + E centers one.
Quick Selecting. You can select all text between the current location of your cursor and the end of the current paragraph by hitting Ctrl + Shift and the down arrow.
Ctrl + [ or ], de- or increases the font of the selected text with 1 point.
Ctrl + “+” for subscript and ctrl + shift + “+” for superscript
Shift + F3 changes the case of selected text — UPPER — lower — Sentence case.
After ctrl-Z you can step back your changes by using Ctrl Y.
Press Control + Shift + C to copy the formatting and styles.
Select the location of the text where the formatting and style needs to be applied, and then
Press Control + Shift + V to paste the style and formatting (including Colors, Fonts, Font sizes, Paragraph styles, Headings and everything else).
Friday, August 24, 2007
DataGridView Column Header Style
In order to use styles in your DataGridView control for your .NET 2.0 Windows application, you must specify dgvMyDataGridView.EnableHeadersVisualStyles = false.
Example of the code:
//Instantiate new DataGridViewCellStyle
System.Windows.Forms.DataGridViewCellStyle dataGridViewCellStyle2 =
    new System.Windows.Forms.DataGridViewCellStyle();

//Define Header Style
dataGridViewCellStyle2.Alignment =
    System.Windows.Forms.DataGridViewContentAlignment.BottomCenter;
dataGridViewCellStyle2.BackColor = System.Drawing.Color.Navy;
dataGridViewCellStyle2.Font = new System.Drawing.Font("Microsoft Sans Serif",
    8.25F, System.Drawing.FontStyle.Regular, System.Drawing.GraphicsUnit.Point, ((byte)(0)));
dataGridViewCellStyle2.ForeColor = System.Drawing.Color.White;
dataGridViewCellStyle2.SelectionBackColor =
    System.Drawing.SystemColors.Highlight;
dataGridViewCellStyle2.SelectionForeColor = System.Drawing.Color.Navy;
dataGridViewCellStyle2.WrapMode =
    System.Windows.Forms.DataGridViewTriState.True;

//Apply Header Style
this.dgvTransactions.ColumnHeadersDefaultCellStyle =
    dataGridViewCellStyle2;

//Disable Headers Visual Styles - apparently there is an "automatic"
// visual style that needs to be disabled
this.dgvTransactions.EnableHeadersVisualStyles = false;
DataGridView - Conditional Color Change
If DataGridView.Rows(i).Cells("locuscount").Value = "0" Then
          DataGridView.Rows(i).Cells("Status").Style.BackColor() = Color.AliceBlue
End If
DataGridView - Click Location & Selected Col/Row
For selected column and row:
private void myDataGridView_MouseDown(object sender, MouseEventArgs e)
{int ColumnIndex =myDataGridView.SelectedColumns[0].Index; // Selected Column Index
int RowIndex = myDataGridView.SelectedRows[0].Index; // Selected Row Index
}
DataGridView.HitTestInfo myHit = dataGridView1.HitTest(e.X, e.Y);
if (myHit.Type == DataGridViewHitTestType.Cell){ // select row == myHit.RowIndex;}
Monday, August 13, 2007
Friday, August 3, 2007
Remove Old Drivers After Upgrading to New Hardware
If you are experiencing weird issues after upgrading your hardware, or you've just upgraded to the latest hardware device and aren't seeing the performance you'd like, you might want to remove the old drivers which are still installed for the old hardware, even though you can't normally see them in device manager.
What you have to do is set a less-known flag to allow you to see non-present devices, and then launch device manager. You'll then see the old devices in the list, and can uninstall the drivers for them.
In Windows Vista, the first thing you'll need to do is open a command prompt in administrator mode. Type cmd into the start menu search box, and then use Ctrl+Shift+Enter to open in administrator mode. (You can also right-click on the command prompt and choose Run as Administrator)
Now paste in the following line:
SET DEVMGR_SHOW_NONPRESENT_DEVICES=1
Then type in devmgmt.msc to start up Device Manager from the administrator command prompt.
Once you are in Device Manager, go to the View menu and choose Show Hidden Devices, which will show all the device drivers including things that aren't currently installed in your computer.You can right-click on the driver and then choose Uninstall from the menu to remove the drivers for that old hardware.
I've found that this can resolve a lot of weird issues, and even increase performance on some machines where you've upgraded a ton of times. This isn't necessarily going to increase performance, but it's nice to have a tidy computer nonetheless.
This tip also works the same in Windows XP.
Friday, July 13, 2007
Control Firefox Tabs With Your Keyboard
Firefox makes mouse-less browsing a breeze with these simple shortcuts:
- Ctrl T will open a new tab
- Ctrl shift T will undo closed tab
- Ctrl Page Up and Ctrl Page Down will scroll through your tabs
- Ctrl Number will bring you instantly to a certain tab. eg. If you hit Ctrl and ?3? you will go to the third tab
- Ctrl D will bookmark the current tab
- Ctrl Shift D will bookmark all the tabs in the window
Thursday, July 12, 2007
Bash Tutorial

Tuesday, July 10, 2007
Hotwire graphical terminal
 Free open-source app Hotwire is a GUI-based terminal with auto completion. Hotwire has most of the functionality of the bash shell tucked into an easy-to-use GUI. Intended to replace the Linux terminal, Hotwire is perfect for Linux beginners. Hotwire is a perfect way for new users to dip a toe into the terminal without diving in head first. Hotwire is a free download for Linux only. Ubuntu users can install Hotwire using:
sudo apt-get install hotwire
*Hotwire isn't in the Ubuntu repository. You have to download the .deb file from getdeb.net and install it manually.
This is also for Windows. See hotwire-shell.org
Sunday, July 8, 2007
Wikipedia for video - Vidipedia
Vidipedia is the first wiki on the internet to feature unlimited,  streaming video as a media option. Users can edit any page or video they like, creating an organized archive of digital media.
Min Map Wikipedia - WikiMindMap
WikiMindMap takes a pleasant visual approach to the text heavy 
Saturday, June 30, 2007
Got Friends? 2500 שקל
החברה משלמת עד 2,500 ש”ח לכל מי ששולח קורות חיים (קו”ח) של מועמד שיתקבל לעבודה.
מה עודאפשר לעשות עם האתר הזה?
* קורות חיים בכמיות ענקיות - אם אתם חושבים בגדול הינה לכם רעיון להקמת אתר. הרעיון בכלליות הוא לפתח רעיון מקורי לפתיחת אתר “מחפשי עבודה” ולעבוד עם האתר Got Friends. חוץ מהכסף מהפרסומות שתרוויחו מהאתר אם יהיה פופולרי, תוכלו להרוויח גם אלפי שקלים משליחת קו”ח וכבר עשו את זה (והתוצאות חיוביות - 4500 קו”ח).
* הפניה עצמית - אם אתם מחפשים עבודה בתחומיים הדרושים בחברה, אפשר לשלוח קו”ח שלך ובמקרה שהתקבלת לעבודה משלמים לך גם כסף מהאתר וגם כסף כי אתה עובד (אפשר לעשות את זה, בדקתי).
* פרסום - עד לפני שחיפשתי על כסף באינטרנט, לא שמעתי על האתר הזה ואני מאמין שלא הרבה מכירים אותו. אני מציא לפרסם את האתר ולגרום לאנשים להירשם תחתיכם וכך להרוויח מהם (האתר משלם על 4 “דורות”).
Unix Filesystem
Windows users who dive into *nix without first researching the operating system are in for quite a shock. The complete lack of a C:\ drive can send Windows switchers into a tailspin. Thankfully, IBM developerWorks does an excellent job of explaining the structure and organization of the *nix filesystem and the perks of the *nix naming conventions.
| Many directories in the UNIX file system serve a special purpose, and certain directories are named per long-standing convention. In this installment of the "Speaking UNIX" series, discover where UNIX stores important files. |
UNIX file system [IBM developerWorks]
Wednesday, June 27, 2007
filehippo.com Update Checker
The Update Checker will scan your computer for installed software, check the versions and then send this information to filehippo.com to see if there are any newer releases. These are then neatly displayed in your browser for you to download.

Saturday, June 23, 2007
CodecInstaller
CodecInstaller is a Windows program that detects the Audio and Video codecs installed on your system, analyzes files to understand which codecs they require and suggests you to install them.
Check out the features tour for usage examples and screenshots of the program.
SYSTEM REQUIREMENTS:
Operating System: Windows 98 - ME - NT 4(service pack5) - 2000 - WindowsXP - Windows Vista
Libraries: Microsoft .NET Framework 2 or higher is required in order to use CodecInstaller. It is freely downloadable from microsoft.com site
LICENSE:
Donationware.
DOWNLOAD & changelog:
CodecInstaller 2.5
Gmail - One Click Conversations
Allows you to view recent conversations with someone in just one click. Also adds rollover popup menu (ala built in quick contacts) to icon in message view.
Wednesday, June 20, 2007
NirCmd v2.00 - Freeware command-line tool
Saturday, June 9, 2007
Firefox - Paste multiple lines to input boxes
Type "about:config" in the location bar. In the "Filter" field type "singleline." You can set the value to 2 for editor.singleLine.pasteNewlines, which will allow pasting of multiple lines to input boxes.
Comments:
Use external source viewer:
Set:
view_source.editor.external = True
view_source.editor.path to Notepad++
Sunday, June 3, 2007
Saturday, June 2, 2007
SMPlayer - A VLC alternative?
SMPlayer is a video player that is supporting the most important video formats out of the box including avi, mpg, mov, wmv and vob plus numerous other formats.
It is also possible to play DVDs and Internet streams with the video player that is available for Windows and Linux. Several ways of displaying subtitles and various subtitle formats are supported including srt, sub and DVD subtitles.
Thursday, May 31, 2007
Remove left side add in bgu forum and reclame space
Tuesday, May 29, 2007
Disable Caps Lock
Now you can disable your Caps Lock key in Windows... without any special software, and without having to pry the key off with a screwdriver. Read on to find out how. I also have a page on how to disable the Windows key.
Background
Accidentally hitting the Caps Lock key when typing up an email or coding can be maddening. Most people never use it anyway, so why not disable it? In Windows, you can by adding some keyboard scancode mapping information to your Windows registry. The complete details are at annoyances.org. To make it even easier, I decided to add some .REG files so you can disable your shift key yourself without needing to muck around with the registry.
Compatibility
This method of disabling the Caps Lock key works with all modern Windows variants: Windows 2000, Windows XP Pro & Home and Windows 2003. It will not work with older versions.
Warnings
- These files are provided without warranty. Use them at your own risk.
- These files will overwrite any keyboard mappings you currently have.
- .REG files update your Windows registry. Incorrect changes to the registry may damage Windows or other installed software. Be sure you know what a given .REG file contains before merging it into the registry.
- These files are unsupported, please do not contact me with questions on their use.
Installation / Files
The following files are .reg files. They modify the Windows registry directly. You should download them to your PC and then double-click them to add them to your registry. After saying YES to the message box, reboot your machine and enjoy freedom from Caps Lock annoyances.
- Change Caps Lock into a SHIFT key: caps_lock_to_shift.reg
- For the UNIX Folks:
- Change Caps Lock into a Control key: caps_lock_to_control.reg
- Swap Caps Lock and the left Control key: swap_caps_lock_and_control.reg
- Disable Caps Lock entirely: disable_caps_lock.reg
- UNINSTALL: Change Caps Lock Back to Caps Lock: remove_scancode_mappings.reg (Removes all scancode mappings) *This file is also useful for completely reseting all key remappings on a PC with oddly mapped keys.
Note: You cannot combine this with my method for disabling the Windows key as it will replace those scancode mappings.
Monday, May 28, 2007
Wednesday, May 23, 2007
Tuesday, May 22, 2007
Sunday, May 20, 2007
Disable Notification Balloons in XP
 Source
Saturday, May 19, 2007
Shortcuts for Special Gmail Labels
Saturday, May 12, 2007
Friday, May 11, 2007
mute the conversation with the Gmail keyboard shortcut "m"
Tuesday, May 8, 2007

Saturday, May 5, 2007
The System.Threading Namespace
The System.Threading namespace provides classes and interfaces that enables multithreaded programming. This namespace includes a ThreadPool class that manages groups of threads, a Timer class that enables a delegate to be called after a specified amount of time, and a Mutex Class for synchronizing mutually-exclusive threads. System.Threading also provides classes for thread scheduling, wait notification, and deadlock resolution.
Some of the important classes in System.Threading namespace is discussed below.
Thread - Represents threads that execute within the runtime, to create and control threads.
ThreadPool - Posts work items to the thread pool. Queue work items for execution on the first available thread from the thread pool. One OS thread pool per process. Efficient use of thread resources.
Timeout - Contains timeout values for the system
Times - Specifies a delegate to be called at a specified time. The wait operation is performed by a thread in the thread pool.
Monitor - Provides the synchronization of threading objects using locks and wait/signals.
Mutex - A synchronization primitive that can also be used for interprocess synchronization. Wait can be used to request ownership of the mutex. The state of the mutex is signaled if no thread owns it.
The thread that owns a mutex can specify the same mutex in repeated wait function calls without blocking its executions. It must release the mutex as many times ti release ownership. If a thread terminates normally while owning a mutex, the state of the mutex is set to signaled and the next waiting thread gets ownership.
Life Cycle Methods
Starting a Thread
The thread class of System.Threading Namespace represents a thread object. By using class object, we can create new threads, delete, pause and resume threads. The thread class creates a new thread and Thread.Start method starts a thread.
thread = new Thread(new TreadStart( writeData )); thread.start();
where writeData is a function which will be executed by the program.
Killing a Thread
Thread class's Abort method is called to kill a thread permanently. Make sure IsAlive is called before Abort.
if(thread.IsAlive){
thread.Abort();
}
Pausing a Thread
Thread.Sleep method can be used to pause a thread for a fixed period of time.
thread.Sleep();
Suspending a Thread
The Suspend method of the thread class suspends a thread. The thread is suspended until Resume method is called.
Resume a suspended Thread
The Resume method is called to resume a suspended thread. If the thread is not suspended, there will be no effect of Resume method.
if(thread.ThreadState == ThreadState.Suspended) { thread.Resume(); } Source